Announcements #
- GitHub Bug and Plan B
- System setup issues?
- Office hours will start next week
- Reminder: bring laptop to class
- Firehose
Design Activity #
Version Control #
Why? #
- Keep a complete record of changes.
- Store metadata with every change to help understand that history.
- Mark special snapshots of your code: “the version submitted to JASA” or “the version used for my conference presentation”.
- Allow easier and more effective collaboration (reduce code conflicts)
- Allow distributed collaboration
- Easily disseminate your code or back it up with a hosting service.
Key Concepts: The Three Trees #
A Snapshot #
At any moment in time what does the collection of information called “your code” look like?
It is a hierarchical arrangement of folders and files – a tree.
[MyProject]       |  100000 MyProject    tree [100001, 100002, 100003, 100006, 100007, 100010, 100014]
  README          |  100001 README       blob ad6b32ed752dac56d8dc7559308195ec
  core.py         |  100002 core.py      blob e25e6b0e7c7bf92d4e861734436c2fd2
  [data]          |  100003 data         tree [100004, 100005]
    maps.gis      |  100004 map.gis      blob 239ccf3e9b7c400c09946af1581dd711
    config.json   |  100005 config.json  blob d383ccd77254e01ea22a55313e94ad14
  gis-util.py     |  100006 gis-util.py  blob abb6712b4ca6d1ba7a2ee6f4a1642c8e
  [tests]         |  100007 tests        tree [100008, 100009]
    test-gis.py   |  100008 test-gis.py  blob e488f57b8c424702898b776d195f2f1c
    test-gfx.py   |  100009 test-gfx.py  blob 731ea463f7b3c9632b32ce57d9805375
  [doc]           |  100010 doc          tree [100011]
    [generated]   |  100011 generated    tree [100012, 100013]
      0AF323DB1   |  100012 0AF323DB1    blob 726232cd6702e61932fbf3ea44a03c6f
      BFEEC9978   |  100013 BFEEC9978    blob d792cf03a1af84fd546054caee49613c
    doc.md        |  100014 doc.md       blob cee77a23ad50c9e419bf77e835f36aed
...               |  100015 ...          ...  ...
On the left is a high-level file-system view of the tree; on the right is a more packed encoding.
- Each object has a unique code called a hash (kept simple here), determined from its contents.
- Two types of objects: blobs are chunks of bytes, trees are lists of hashes.
- Our tree is now an associative map: hash -> contents
Notice that we don’t really need the names of the files to maintain this data. The filenames are human-centric metadata.
We have a single snapshot as a tree:
100000
 HEAD
A Change #
Now we change a file, say README. How can we record what has happened?
100000 MyProject    tree    [100001, 100002, 100003, 100006, 100007, 100010, 100014]
100001 README       blob    ad6b32ed752dac56d8dc7559308195ec
100002 core.py      blob    e25e6b0e7c7bf92d4e861734436c2fd2
100003 data         tree    [100004, 100005]
100004 map.gis      blob    239ccf3e9b7c400c09946af1581dd711
100005 config.json  blob    d383ccd77254e01ea22a55313e94ad14
100006 gis-util.py  blob    abb6712b4ca6d1ba7a2ee6f4a1642c8e
100007 tests        tree    [100008, 100009]
100008 test-gis.py  blob    e488f57b8c424702898b776d195f2f1c
100009 test-gfx.py  blob    731ea463f7b3c9632b32ce57d9805375
100010 doc          tree    [100011]
100011 generated    tree    [100012, 100013]
100012 0AF323DB1    blob    726232cd6702e61932fbf3ea44a03c6f
100013 BFEEC9978    blob    d792cf03a1af84fd546054caee49613c
100014 doc.md       blob    cee77a23ad50c9e419bf77e835f36aed
100015 ...          ...     ...
101033 README'      blob    a1d09363bc48b91ecf2b2bae8a0a533b
101034 MyProject'   tree    [100133, 100002, 100003, 100006, 100007, 100010, 100014]
Now keys 101034 and 100000 point to two different versions in our history. Try drawing this out as a tree to see it clearly.
So, we have two snapshots in a sequence
100000 <--- 101034
             HEAD
Make another change, regenerate the files in doc
100242 0AF323DB1'   blob    1dcab182eb803c7f3e4459c69f20c5f0
100243 BFEEC9978'   blob    abb0acf24574303090c3455c71bbf94c
100244 generated    tree    [100242, 100243]
100250 doc'         tree    [100244]
102388 MyProject''  tree    [100133, 100002, 100003, 100006, 100007, 100250, 100014]
100000 <--- 101034 <--- 102388
                         HEAD
Three snapshots (each a tree) connected into a history. In each case,
we call the most recent node in this history HEAD. It’s a label,
a pointer into the history.
In git, each snapshot of the code at a particular instant is
called a commit.
The collective information in all these trees (and a couple more we haven’t seen yet) is called a repository.
One More Change #
Thinking about it, we realize that we want to try something out
starting at commit 101034. So we “move to that snapshot” and make
a change: adding a new file packages inside the MyProject directory.
This gives
102521 packages     blob    e26fe3c3348c976e937b81423b561ebe
102388 MyProject''' tree    [100133, 100002, 100003, 100006, 100007, 100010, 100014, 102521]
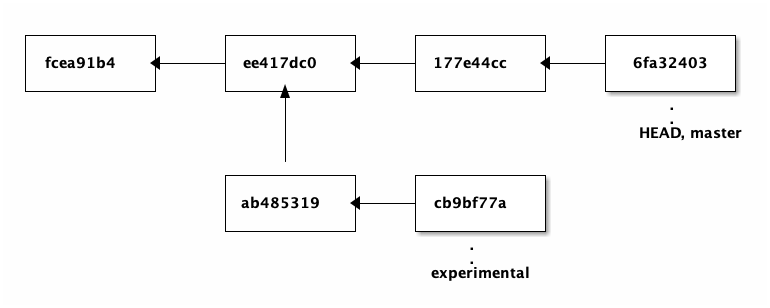
Our history looks like:
                   experimental
              --- 102388
              |
              v
100000 <--- 101034 <--- 102388
                       HEAD, main
We give snapshot 102388 a tag experimental to remind us why we made it. Here we see a branch in the tree, a pointer to a specific line of development. Actually, we have two branches here:
HEADand main are pointers to the latest snapshot (commit) on the main branch, where we started.- experimental is the pointer to the latest snapshot (commit) on the experimental branch.
Oh what a tangled web…
The Three Trees #
But how do we “move” around in this history, as described above.
The answer is that we work with three special trees:
- HEAD - the latest on the current branch
- Index - a tree forming a proposed next commit
- Working Tree - a tree representing a sandbox copy of our files
The working tree is the version of the files that we see in our editor. We can make what changes we like when we are working without changing the other trees.
When we have made changes that we think we want to save, we first add them to the index. This is a tree that starts as a copy of the latest commit but is amended by changes staged from the working tree.
Staging: Working Tree => Index
When we have staged all the changes we like, we are ready
to commit. We enter metadata like a commit message
and the index tree becomes the newest snapshot/commmit.
It is added to the history with a pointer to the
previous HEAD, and HEAD is moved to point to it.
Committing: Index => HEAD
When we “move” in the history, we move the HEAD pointer
to another commit and checkout that commit. The snapshot
pointed to in the history is copied and becomes
the files we see in the new working tree.
Checkout: HEAD => Working Tree
That’s git’s main job. All the rest is details!
Merging #
After working a bit on the experimental branch, we decide we’d like to use our new ideas, but we want to also use the changes on the main branch. For this we merge the commits on the two branches.
Here’s a related picture of the two states:
Git Commands #
There are two kinds of git commands: plumbing commands are low-level utilities for tooling and combining into higher-level scripts, and porcelain commands implement user-level tasks. We will focus on the latter.
There are many commands in git, but a few are every-day common:
| git status | Get current state of repo and three trees |
|---|---|
| git log | Look at repository history |
| git diff | See what has changed between commits |
| git init | Initialize a new repository |
| git add | Stage one or more files |
| git branch | Create and manage branches |
| git switch | Switch branches |
| git checkout | Checkout a commit |
| git commit | Commit the current index |
| git merge | Combine changes from multiple commits |
| git remote | Associate repo with a remote repo |
| git push | Send new commits to a remote copy of this repo |
| git fetch/pull | Receive new commits from a remote repo |
| git worktree | Work on multiple branches at the same time |
Learning by Doing #
-
Clone (download) an existing repository:
cd ~/s750
git clone https://github.com/36-750/git-demo.git
cd git-demo/            # move into the cloned repository
git status              # check the status
ls -a                   # observe the .git hidden directory
git clonewill ask for your GitHub username and password. -
Open the
git-demofolder in Explorer or Finder or whatever you use on your computer to find files. Look – it’s the same stuff. -
Make a branch and switch to it.
git branch your-clever-name-here
git branch
git switch your-clever-name-here
The branch is split from where you currently are – the commit
git statusshows as most recent.(Note that
git switchis new, and you will often see people usegit checkoutfor this; butgit checkoutdoes lots of different things, depending on the options you give it, and can be confusing.git switchdoes only one thing: switch branches.) -
Make some changes to your repository. Add files, edit something, whatever. In Git terminology, you’re making changes in the working directory.
-
Add the changes to the index, so they are staged to be committed.
git status git add file_you_changed.py -
Commit the changes (No, no, I’m sane, I tell you. SANE!)
git commitGit will open an editor to let you type a full commit message. Close the file when you’re done so Git knows you’re done.
If you have a very short commit message, you can do it in one step:
git commit -m "Your very short commit message" -
Make more changes and stage them.
-
Look at differences
git log # default log git log --oneline --abbrev-commit # terser log git diff 3597a84 e3f8f5d # replace with current hashes -
Push this branch to the remote repository (on GitHub)
git push --set-upstream origin your-clever-name-hereThe
--set-upstreamoption is only necessary once, to tell Git that the “upstream” for this branch – the remote location for it – is the corresponding branch on GitHub, which will be created automatically. -
Switch back to the main branch:
git switch main
ls
Now look at the files in your repository. Notice they’ve all changed back to what they looked like before you switched to your branch.
-
Look at the status
git status git log --pretty=oneline --abbrev-commit -
Make a pull request on GitHub
This is similar to the workflow we’ll use for submitting homework. We’ll provide you a script that automates part of it, but it’s good to know basic Git operations so you know what’s going on when you switch branches and submit homework.
Git-Related Services #
Git vs. GitHub/GitLap/Bitbucket
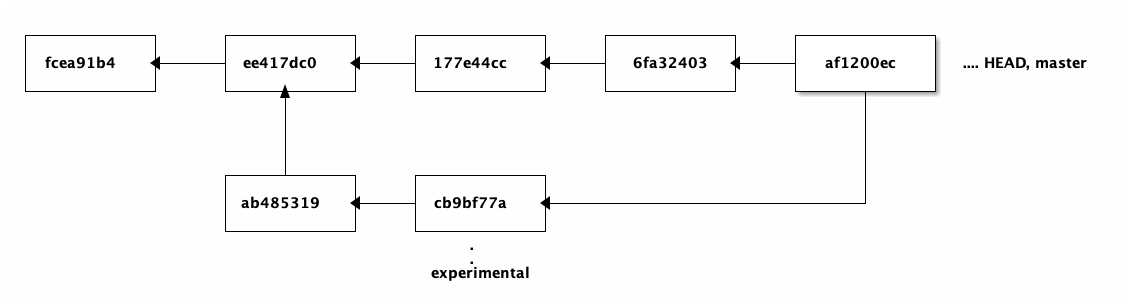
Activity (cont’d): Merging #
Let’s go back to that commit graph we were looking at. Suppose we merged the
experimental branch into main:
git switch main
git merge experimental
The commit af1200ec is a merge commit, the snapshot of the code after
experimental has been merged to main. The merge commit has two parents.
Git can show you a graph of commits with the command
git log --graph --oneline --color
I’d like you to recreate the graph above by making commits and branches. Team
up with someone next to you to plan how to do this. Start from the main
branch:
git switch main
To make a graph just starting from main, not including previous commits,
try
git log --graph --oneline --color e625475.. --
which tells Git to graph the commits since e625475, the most recent I made on
the main branch. It should be empty at first, since there is nothing new on
main.
Good Habits #
Write good commit messages! #
Commit often #
Use git blame to find out why changes were made #
Resources #
- Reference Notes on Version Control
- Learn Git Branching is an interactive tutorial, with diagrams
- The Software Carpentry Git lesson walks you through basic Git operations on your computer
- ProGit is a full book about Git that you can read online
- The Git Reference Manual lists every single Git command and its options
- GitHub’s Git Cheat Sheets explain some of the common commands
- Dangit, Git! explains how to fix common Git problems you may encounter
- RStudio Git integration documentation
man git-logat command line, or more generallyman git-X.
We recommend trying the git-challenge homework assignment and referring to the
resources above as you do it, so you understand each step you’re taking.